C64 - DTV2 with IEC, keyboard and joysticks
Introduction
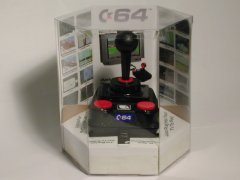
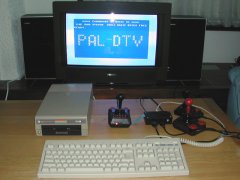 This article is about hacking a C64 DTV-2 (PAL version). The following will be added: IEC (disk drive), keyboard external power-supply and two joysticks. The C64 DTV-2 will be connected to a small box with all the connectors.
This hack is not simple but can be done with some basic tools:
- Mini drilling machine like a Dremel.
- Some drills an cutters.
- A couple of needle files, screwdrivers.
- Small pliers, mini saw, ect.
- Soldering iron for electronics (Weller WECP-20)
- Multi-meter with V, A, Ohm, "beep"
Gerelateerde links.
The parts.
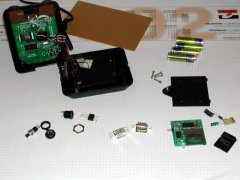 You will need some components:
- 2 x DB9 male connectors PCB mounted (Joystick)
- 1 x DIN 5 pole female connector PCB mounted (Keyboard)
- 1 x DIN 6 pole female connector PCB mounted (IEC serial)
- 1 x Voltage plug 2,1 mm PCB mounted
- 1 x push button switch 'make'
- 1 x experimental PCB (90 x 60 mm)
- 1 x Voltage regulator
- 1 x 470 uF capacitor
- 2 x 100 nF capacitor
- 1 x rectifier single phase 1A
- 1 x Plastic box 112 x 62 x 32 mm
- some nuts and bolts to attach the PCB.
- lots of wire (flat-cable)
First get the connectors, you can salvage them from old (non-Commodore) computers. I sawed out the connectors from a old PCB and then cut between the solder-pads with my saw, after that I soldered of the remaining PCB pieces. But you can buy the connectors at a local electronics shop.
Before cutting the holes the plastic box make sure the connectors and electronics have enough space when the box is closed. If you want the box to be removable include another connector with at least 17 connections. And put a connector on the flat cable that comes from the DTV.
The schematic.
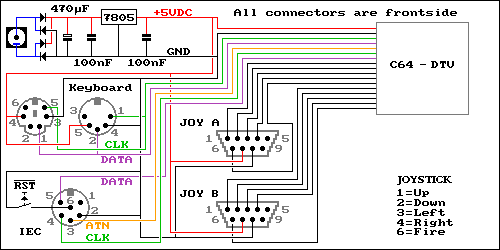 In the top left corner of the schematic you see the +5VDC power supply. The voltage gets rectified if necessary and is transformed into a rimpel free DC voltage by the capacitor (470uF). Next the 7805 voltage regulator will change the voltage to exactly 5 VDC. The two capacitors (100nF) will filter out any interference.
Below the power supply the keyboard connector is drawn. You may choose to use only one (old or PS/2). The keyboard is fed with 5 VDC and GND. The clock signal and the data signal are connected to the DTV2 unit.
In the bottom left corner you can see the IEC serial connector. GND is connected and the data, atn and clock are connected to the DTV2 unit. An extra switch is connected so you can reset the drive without resetting the DTV2 unit.
In the middle there are two joystick ports. Both ports have 5 VDC and GND so it is possible to use Autofire. The joystick signals are connected to the DTV2 unit.
All the wires that go to the DTV2 unit are marked in one of the photos above.
I used a simple experimental PCB where I put all the connectors and electronics. At the bottom side of this PCB I made all the connections between the connectors and the electronics. I used PCB mounted connectors because I wanted a clean looking expansion box without lots of nut or bolts visual. But chassis mounted connectors are easier and you can use a smaller PCB.
The PCB.
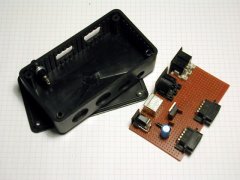 In the picture you can see the expansion-box I made to hack the DTV2. I have put the connectors and some electronics on the experimental PCB. On the most left corner of the PCB you can see a power-connector. This is the connector that powers the whole DTV2 and the keyboard. Above that there is a PS/2 keyboard connector (metal) and above that a older style keyboard connector (plastic). You don't need two keyboard connectors but I wanted to experiment with different keyboards. The connector at the top of the PCB is the IEC serial connector to connect a disk drive or printer. On the right side of the PCB there are two joystick connectors.
The electronic components are: a rectifier, three capacitors and a voltage regulator. This makes a simple 5 VDC power supply for the DTV and the keyboard. On the picture you can see a single diode which prevents connecting a voltage adapter with the wrong polarity. In the final design (photo below) I put in a single phase bridge rectifier (with 4 diodes build into one component). With this you can connect right or wrong polarity without damaging the unit. Even AC is possible with this setup. The supplied voltage can be in the range of 9 to 15 volts DC or AC.
Take your time to cut the holes and soldering the wires. It is easy to mess things up. If you look at the picture you can see that I touched the right side of my box with my soldering iron and partly melted the box.
The expander box.
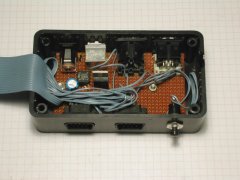 In the picture you can see the PCB installed in the expansion-box. The wires are connected to the PCB. The push-button switch is connected to the serial IEC bus and will give a reset to the connected disk drive when pushed. On the left side of the box I made the side a bit lower. This will give the flat cable the space to enter the box. Make this as narrow as possible so the closed lid of the box is also preventing that the flat cable is pulled out of the box.
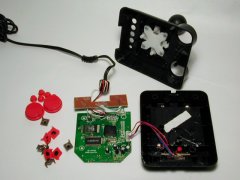
Opening the DTV.
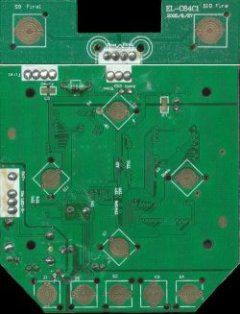
The PCB (bottom).
The PCB (top).
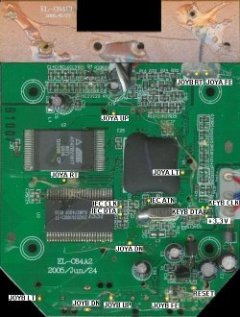 The connections below are described as in the pictures of the PCBs. The TPx numbers are on the picture of the bottom side of the PCB. The Rxx Numbers are on the top side of the PCB. (Top side is where the chips are) The yellow dots are the soldering points for the extra connections.
The joystick on the DTV is: JOYA
JOYA UP = Joystick Port 2 Up
JOYA DN = Joystick Port 2 Down
JOYA LT = Joystick Port 2 Left
JOYA RT = Joystick Port 2 Right
JOYA FE = Joystick Port 2 Fire
JOYB UP = Joystick Port 1 Up
JOYB DN = Joystick Port 1 Down
JOYB LT = Joystick Port 1 Left
JOYB RT = Joystick Port 1 Right
JOYB FE = Joystick Port 1 Fire
IEC ATN = Disk-drive IEC ATN (TP1 - The hole just right of R13)
IEC CLK = Disk-drive IEC CLOCK (TP8 - The hole just below the left side of R35)
IEC DTA = Disk-drive IEC DATA (TP9 - The hole just below the left side of R47)
KEYB DTA = Keyboard DATA (TP4 - The hole just above of R4)
KEYB CLK = Keyboard CLOCK (TP3 - The hole just above of R3)
+ 5VDC is connected to the + of the battery holder.
GND is connected to the - of the battery holder.
Connecting the wires in the DTV.
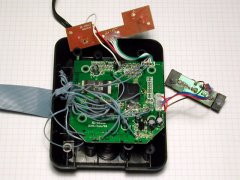 In the picture you can see the DTV2 unit with the wires connected. The wires go to the expansion box. I made a narrow square hole inside the battery holder and made a little slot at the side of the battery cover to get the flat cable into the DTV2 unit. The connected wires are 5 VDC, GND, 10 lines for the 2 joysticks, Keyboard clock and data, serial IEC: ATN, data, and clock.
If you use flat cable you can push the core of the wires in to the little holes that connect the copper lines from the bottom side to the top side of the PCB. You will have to remove a bit of glue to get to some of the soldering pads. Some soldering pads are protected with a green layer. Carefully remove the green later with a knife but don't damage the copper beneath it.
When soldering be very careful and use a very small soldering tip. When I soldered on the IEC clock wire I actually soldered of the little SMD resistor next to it. Took me 10 minutes to find it and put the resistor back on the PCB.
Testing the DTV.
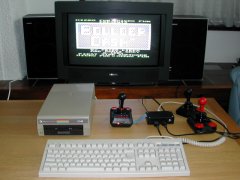 After all the modding check all the connections you made a second time to be sure you got it right. Then the big moment putting it all together.
Connect all cables, serial IEC, keyboard, joysticks and the power supply. Turn on the DTV2 unit and after that turn on your floppy-drive. The DTV2 should boot normally like nothing has changed.
After it has booted press down on the 'CTRL' on your keyboard. Reset the DTV2 while holding down the 'CTRL' on your keyboard. If you get the C64 blue start screen let go of the 'CTRL' key. To be quicker at boot up do the RESET and 'CTRL' straight after turning on the power.
Put a disk in your drive and load the directory with:
LOAD''$'',8 [ENTER]
LIST [ENTER]
If you get the dir you're drive works.
Go and use it to play all those great games...
Update: 2019-05-11 13:17:03
