KCS Power Cartridge
Introduction
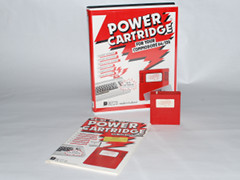 The Power Cartridge is a BASIC-toolkit, fast loader/saver for disk (6x) & cassette (10x), a machine language monitor, function-keys, a printer-toolkit with hardcopy and a total back-up system for the Commodore C64 computer. The Power Cartridge was made by Kolf Computer Supplies (KCS) in the Netherlands. The developers are: Peter Verhey, Krijn Kolff, Bas van Rossem and Paul Hopper.
BASIC-Toolkit:
AUTO, COLOR, DEEK, DELETE, DOKE, DUMP, FIND, HARDCAT, HARDCOPY, HEX$, INFO, KEY, MERGE, PAUSE, PLIST, PSET, RENUM, REPEAT, SAFE, TRACE, UNNEW, QUIT, $, DLOAD, DSAVE, DVERIFY, MERGE, DIR, DISK, DEVICE and AUDIO.
F-Keys:
F1=LIST:, F3=RUN:, F5=DLOAD:, F7=DIR:, F2=MONITOR, F4=UNNEW:, F6=LOAD"",2, F8=DISK"
Monitor:
Assemble, Compare, Disassemble, Fill, Go run, Hunt, Load, Interpret memory, Jump, Load, Memory display, Print, Register display, Save, Transfer, Verify, Walk, eXit and $ (directory).
Reset:
Continue, Basic, Reset, Back-up disk, Reset all, Back-up tape, Hardcopy and Monitor.
The Power Cartridge has a Reset button and a 16 kB operating system.
The Power Cartridge is not a simple EPROM cartridge, it has extra components to make the special functions of the Power Cartridge possible. The company KCS made an effort to "hide" the technology of the Power Cartridge. The most obvious is that they removed all the markings of the IC-components. And the address lines are "scrambled" what results in an EPROM image that is unreadable if you read the EPROM with an EPROM programmer.
So, how can you find out how the Power Cartridge works? You need to do some "reverse engineering". There are at least two hardware versions of the Power Cartridge. There is version 3.6 with the "big" switch and six IC-components, and version 4.5 with the "little" switch and seven IC-components.
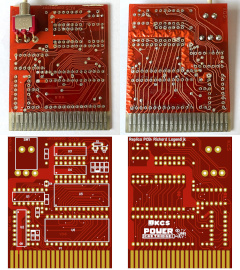
Luckily, KCS stopped removing the markings of the IC-components in the later model (v4.5). For this reason, I started to reverse engineer the later model (v4.5) first. In the next parts, you can see the replica PCB's and schematics I made for all three versions. [572]
The PCB of the Power Cartridge v4.5
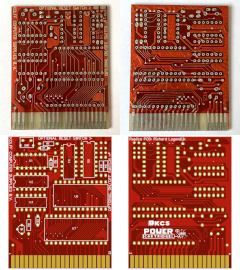 To make a replica PCB, you need to know where all the copper-traces connect to. For the bottom side, this is not so difficult, you only need to remember to draw the mirror image in a PCB drawing program. I measured all the locations of the holes and via's and drew them in the PCB drawing program. After that, I connected all the copper-traces to the holes and via's.
The upper-side of the PCB is more difficult, because the components are obscuring the copper-traces. You can use a multi-meter and measure all the connections, but that is not that easy and can lead to mistakes if the components themselves connect different holes internally. For that reason, I removed all the components from the upper-side of the PCB.
The replica PCB is very close to the original, but there are some differences. The original PCB has a different way to display the text and doesn't show where the components are placed, and I added a Power Cartridge logo on the bottom-side.
The PCB drawings are made with EasyEDA, which is a free online PCB development program. [573]
The schematic of the Power Cartridge v4.5
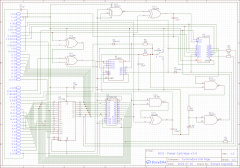
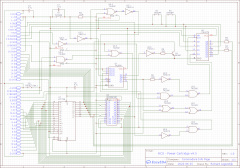 After drawing the replica PCB, I started to draw the schematic. This looks simple, but it is more difficult than you think. But after many hours the schematic was ready.
In the schematic, you will see a "normal" Reset-switch and the possibility to add an On/Off switch. Both of these switches are optional, and are not present on the original Power Cartridge v4.5.
The schematic is also drawn with EasyEDA. [574]
The PCB of the Power Cartridge v3.6
The schematic of the Power Cartridge v3.6
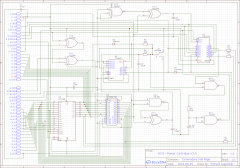 Drawing the schematic of the Power Cartridge v3.6 was more difficult than the schematic of the Power Cartridge v4.5. This is because all markings of the IC-components are missing.
I hoped that KCS used the same IC-components for both versions, but after drawing the schematic, I found out that the connections to the U2 IC were not right. The EPROM (U6), the RAM (U5) and the 74LS90 (U4) are the same in both versions.
So how did I find out what the three unknown (U1, U2 & U3) IC's are. I started with component U2, the 16-pin IC. I looked at all 16 pin IC's from the 7400 series and checked if they had the 5 VDC and GND on the correct pins. Then I checked if they had any similarity to the 74LS175 from version 4.5. This led me to the 74LS174 which is similar, and all connections made sense.
The next IC was U1 which I thought was a (N)AND or a (N)OR looking at the partial finished schematic. I placed U1 on a bread-board and made a truth table of the in- and outputs, and it turned out to be a quad EXCLUSIVE-OR.
Now I got close to completing the schematic, but I needed to find out what U3 was. I knew which pins were inputs and which were outputs, but they were different from the most IC's in the 7400 series. After checking the 7400 series and testing on the breadboard, I found out that it was a 74LS01. [576]
The PCB of the Power Cartridge v3.4
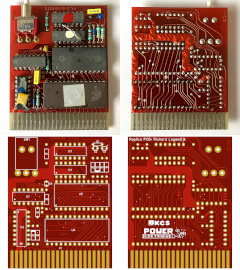 The PCB of the Power Cartridge v3.4 is most likely the first production run of the Power Cartridge. This version has a design mistake on the PCB and this mistake was rectified in version 3.6. To solve this mistake, pin U3-3 was disconnected from the PCB and connected with a wire to U4-7.
The other differences are that R1 = 1k8 ohm, U6-27 is connected to A15 of the cartridge port, C6 = 4n7 F and the text on the PCB is a little different. [577]
The schematic of the Power Cartridge v3.4
Technical information about the Power Cartridge
Building your own Power Cartridge replica is possible with the information above. I did spend hours and hours making and checking the PCB and schematic, but I can't guarantee that the drawings are perfect. If you build a Power Cartridge replica with this information, it is on your own risk. You also must consider that the company KCS is still active, and has all the rights to the design of the Power Cartridge.
But if you are successful, let me know!
The technical files for the Power Cartridge. [579]
But if you are successful, let me know!
The technical files for the Power Cartridge. [579]
Power Cartridge replica by VK5LN
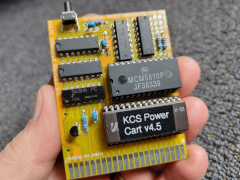 VK5LN used the available files for making a replica of the Power Cartridge (v4.5). He was able to source all the components, and wrote the firmware to an EPROM. He made slight adjustments to the PCB design, and after it arrived he added all the component and it works perfectly. He added this replica to his collection of replica cartridges: EPYX Fastload (FreeLoad ROM), The Final Cartridge III, Super Snapshot (SnappyROM), Magic Formel, Super Zaxxon, SideKick64 and the RAD Expansion Unit.
[614]
Update: 2022-07-09 12:11:30
